
Connecting to multiple Oracle Cloud Environments
Sarah Ansell
Brovanture Consultant
Connect to multiple EPBCS environments via Smart View Shared Connections XML
Switching environments, changing domains, logging in, logging out…
Why not save valuable time by creating a Smart View environments short-cut?
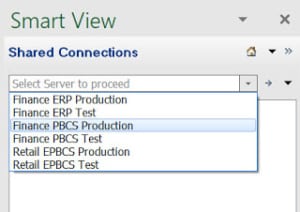
Here’s how!
First, gather the following details for each environment that you would like to add to your drop-down list:
1. Environment URL (PBCS/EPBCS):
Here is an example:https://planning-exampleDoM.pbcs.exampleDC.oraclecloud.com/HyperionPlanning
You will need to append the URL with ‘/SmartView’.
Using the same example:
https://planning-exampleDoM.pbcs.exampleDC.oraclecloud.com/HyperionPlanning/SmartView
(where Domain name = exampleDoM and Data centre = exampleDC)
Please note that newly provisioned pods now the new URL format for access to the Workspace, for example:
https://epm-exampleDoM.epm.exampleDC.oraclecloud.com/epmcloud
I believe that for the time being, the old format will still be used within SmartView connections, however this may change in the future.
2. Chosen Shortcut Name: ie. Finance PBCS Production
Tip 1: Other Oracle Provider Types
I have only included the PBCS connection as an example here. See the Oracle Documentation for examples on how to connect to Essbase, EPRCS and more!
Tip 2: Connecting Smart View to Oracle Financials Cloud ERP
For those that use Oracle Financials Cloud as a data source for Oracle PBCS, you may wish to use Smart View to query the ERP data which you can do by connecting to the underlying Essbase ASO cube.
Use the Essbase Connections URL: https://exampleDoM.bi.exampleDC.oraclecloud.com/aps/SmartView
For more tips on how to pull data from Oracle Financials Cloud to PBCS see Lydia’s blog.
Step 1.
Open a text editor to begin creating your XML file – Notepad will do.
Begin the XML as follows:
<?xml version=”1.0″ encoding=”UTF-8″?>
<res_GetProvisionedDataSources>
Step 2.
For each environment you wish to add to the drop-down list add the following syntax:
EPBCS/PBCS Environments:
<Product id=”HP” name=”HP-11.1.2″ displayVersion=”version”>
<Server name=”EPBCS Production Environment” context=”https://planning- exampleDoM.epm.exampleDC.oraclecloud.com/HyperionPlanning/SmartView”></Server>
</Product>
Step 3.
Once all the environments have been listed, finish the XML as follows:
</res_GetProvisionedDataSources>
Click Save As, then change the document type to XML. Save the file in the SmartView folder that contains the SmartView exe file, if possible.
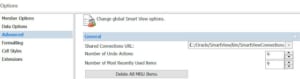
Step 4.
Reference the XML file location in your SmartView Options URL setting.
For example, I store the XML file in the SmartView install folder and therefore the URL is:
C:/Oracle/SmartView/bin/SmartViewConnections.xml
Ta Da!
The full script should resemble the below:
<?xml version=”1.0″ encoding=”UTF-8″?>
<res_GetProvisionedDataSources>
<Product id=”HP” name=”HP-11.1.2″ displayVersion=”version”>
<Server name=”EPBCS Production Environment” context=”https://planning-domain.pbcs.datacenter.oraclecloud.com/HyperionPlanning/SmartView”></Server>
</Product>
<Product id=”HP” name=”HP-11.1.2″ displayVersion=”version”>
<Server name=”EPBCS Test Environment” context=”https://planning-test-domain.pbcs.datacenter.oraclecloud.com/HyperionPlanning/SmartView”></Server></Product>
<Product id=”HP” name=”HP-11.1.2″ displayVersion=”version”>
<Server name=”Oracle Financials Production Environment (Essbase cube)” context=”https://domain.bi.datacenter.oraclecloud.com/aps/SmartView”></Server>
</Product>
</res_GetProvisionedDataSources>
Until next time
Sarah


 +44 (0)1483 685450
 contact us