
Customising the Oracle EBS GL Balances to Oracle Cloud EPM Connection
In my first blog on the Oracle EPM Integration Agent, I covered pulling Oracle EBS GL Balances from on-premises Oracle EBS to Oracle Cloud EPM connection for Oracle Cloud EPM Planning, using the out-of-the-box Oracle connector in data management.
However, as described, there are a few shortcomings with the connector which make it more desirable to use a custom SQL query to pull Oracle EBS GL balances into Oracle Cloud EPM. The main issue being that the Oracle data load rules can only be run for a single ledger and period each time, making it difficult to update multiple historic periods at once and inefficient if there are multiple ledgers in Oracle EBS.
Fortunately, it is possible to retrieve the full ‘EBS GL Balance’ SQL query and tweak it, rather than having to start from scratch (thanks Oracle!)
This blog will cover the below points, detailing a few simple ways that the SQL can be adapted to improve usability:
- Retrieving the original Oracle EBS GL SQL query
- Updating SQL WHERE Criteria to:
- Remove the Ledger filter, allowing import of all Ledgers at once
- Use a Like query for the Period, rather than an Equals
- Adding a field to the query for the correctly formatted Period name, to allow multi-period retrievals using default period mappings
- Setting up the custom integration
- Retrieving the Oracle EBS GL SQL Query
Firstly, we need to extract the SQL query that is used by the Oracle EBS GL connector. To do this, you will need to setup the connector as described in my first blog: HERE
Run the data load rule and navigate to the Process Details page. Open the log in notepad and copy the Original Extract Query section, starting with a SELECT statement.
- Updating SQL WHERE Criteria
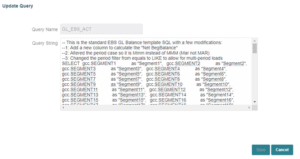
The Ledger and Period filters in the data load rule are used in the SQL WHERE conditions at the end of the query, as below:
— Original SQL Conditions
AND gld.NAME = ~LEDGER~
AND PERIOD_NAME = ~PERIOD
To remove the Ledger filter, we can just remove the whole line referencing the Ledger variable (in italics above). The Ledger field can be referenced in the import format to allow mapping and filtering by Ledger, rather than having to change the Ledger filter each time or have multiple rules to cover exporting multiple Ledgers. Make sure to add this in the Import Format and Data Load Mappings area if required!
For the period, we need to update to use a LIKE criteria, rather than equals. In this instance, we also changed the variable name, so the new filter criteria are as below:
—New SQL Conditions
AND PERIOD_NAME like ~PERIOD_NAME~
Now, instead of having to specify a single period, we can use wildcards. For example, by setting the filter to % the query will import ALL periods, rather than just one period.
- Adding field for Data Management Period name
The final issue we face is that the period format in Oracle EBS is MMM-YY (e.g. JAN-21), whereas Data Management default period mappings use format Mmm-YY (e.g. Jan-21) and unfortunately, these mappings are case sensitive.
So, to allow multi-period loads we have two options:
- Setup an explicit calendar to map the Oracle EBS period to the Oracle Cloud EPM period – this isnot ideal as it would require additional maintenance
- Or, we need to convert the period to be in the correct Mmm-YY format as part of the SQL query
For flexibility, we’re going to go with option B here. To do this, we add a field to the SQL query which converts the original Oracle EBS period from MMM-YY to Mmm-YY format, using the INITCAP function, as below:
— SQL modified with the INITCAP function to change the case of the period from MAR to Mar
INITCAP(gb.PERIOD_NAME) as “Period Name”,
gb.PERIOD_NAME as “GL_Period”,
We must keep both period name formats as the drill-through requires the all-capital format to be referenced in Oracle EBS (blog to follow on EBS drill-through setup 😊)
- Setting up the Custom integration
Once the SQL has been edited, run the query against the Oracle EBS tables to test, remembering to replace the ~PERIOD_NAME~ variable with a real period value or use a wildcard %. Right click and export the output to Excel. Remove the data, leaving the column headers only and save as a csv format.
Note: the step to create the csv headers can be done manually instead, but the column names must match the SQL query headers exactly (be careful of typos in the original Oracle SQL!)
Then, navigate to Data Exchange -> Actions -> Query and create a new query to hold the SQL. Add some commentary at the beginning of the query (using –), to explain the purpose:
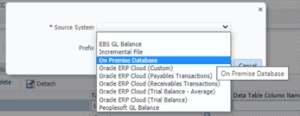
Once we have the query and the csv headers, we can setup a custom data source using the generic ‘On Premise Database’ source system type, rather than using the ‘EBS GL Balance’ type.
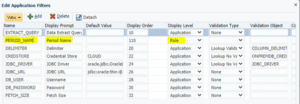
Upload the csv containing the column headers and make sure to reference the above SQL query in the EXTRACT_QUERY section of the application filters, along with the Oracle EBS connection details.
I won’t go into detail here, but rather refer you to another of John Goodwin’s excellent blogs on the subject: HERE
Edit the application filters to add the PERIOD_NAME filter. This will be displayed at Rule level, as below:
Then in the Import Format, we can reference the correctly formatted Period Name column to be used as the load period. This will then be mapped to the EPM period using the default period mappings, as normal. We also import the GL_Period as an attribute for use in the drill-through later and reference the Ledger Name for mappings (as described in step 2).
Map the amount and the rest of the dimensions:

Add a new Data Load Rule, referencing the query import format.
The Period Name filter will display automatically in the load rule – this will require the Oracle EBS period format (e.g. JAN-21) or a wildcard (e.g. %-20 to import all 2020 months).
Note: although the condition says Equal here, the filter is in fact using a like condition in the query.

Setup the data load mappings as required and import the data as normal.
To import multiple periods, set the period name filter as % in the data load rule and select different start and end dates when importing – the periods will be mapped to the correct place in Oracle Cloud EPM using the default period mappings.
Hope that helps and let me know how you get on!
For more useful Oracle Cloud EPM and NetSuite ERP blogs posted by my colleagues, see the Brovanture website HERE
Until next time.
Lydia


 +44 (0)1483 685450
 contact us