
Loading valid intersections in bulk to Oracle PBCS
Mike Falconer
EPM Consultant
A very useful feature of PBCS over traditional Oracle Hyperion Planning is the ability to define Valid Intersections of your dimension members. This means you can restrict your users to only enter data into specific intersections of several dimensions which you define.
This is built to plug the inevitable gap that dimension level security cannot cover. As an example let’s say that we want to restrict certain employees to enter payroll data for one entity, and Revenue data for another entity. If a user has access to both entities, they can now enter payroll data into the wrong company, causing confusion and frustrating users.
Valid Intersections sets up a second layer of data integrity, and saves lots of time in the long run for both the user and the administrator. In practice the cells that are defined as invalid appear read-only to the end-user, or can even be suppressed automatically by forms, adding some more interesting techniques that I will explore in future blogs.
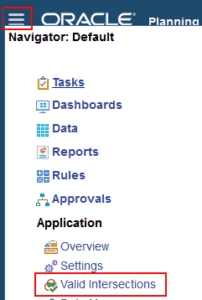
So where do I find this wonderful feature and start putting it to good use? First you need to use the navigator button, and look for Valid Intersections:
To create a Valid Intersection, use the aptly named Create button and you should end up with a screen looking something like the below:
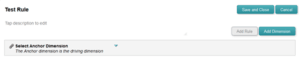
From here you need to select an Anchor dimension, which is the dimension choice that drives the valid Intersections. The important thing here is to choose whether ![]() or not. If you turn it off, then all members of your anchor dimension will be read-only for any Intersections that you don’t define, so rather than specify an intersection for every entity, we leave it on.
or not. If you turn it off, then all members of your anchor dimension will be read-only for any Intersections that you don’t define, so rather than specify an intersection for every entity, we leave it on.
Next we need to add another dimension to have intersections of, so we use Add Dimension and define Analysis 1, where our demo Employee dimension is kept. The next step is to select the actual members we want using the member selector tool, and as usual we can select formulae as well.
But, as with anything good, there’s a catch. It’s not yet been made easy to upload these Intersections in bulk, making them fiddly and time consuming to use. Fortunately, your friends at Brovanture have developed a “life-hack” to speed up the process of creating them in bulk.
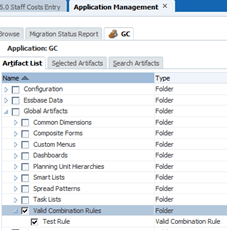
The first step is to export the Valid Intersection rule that you just created using Migration, and download the application snapshot to your PC. This will download as a compressed file format. Next find the XML which should be stored under the folder structure:
Export-Name\Application-Name\resource\Global Artifacts\Valid Intersection Rules
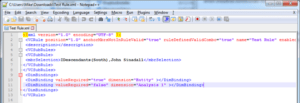
Before continuing, you should take a backup of this xml file, and then copy it to another location to work with. Open up your XML using a text editor like Notepad++ to see the format of the file that we will need to replicate using our hack:
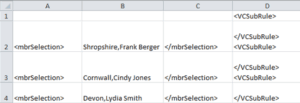
This all looks absolutely awful to deal with, right? We are going to use Excel to make formatting this XML document much simpler. Opening up a fresh Excel workbook we can now enter the following information into the columns:
| Column | Contents |
| A | <mbrselection> |
| B | Your data, comma delimited |
| C | </mbrselection> |
| D |
</VCSubRule> |
Note: Column D contains a line-break in the cell. Use Alt-Shift to achieve this in Excel.
In addition, the top cell of column D should be and the bottom cell should be . This gives you the following expandable structure:
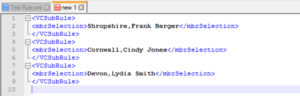
To add more valid Intersections, copy row 2 or 3 as many times as required and change the data in column B. Next, we need to copy the entire excel grid into a fresh Notepad++ document. This is where we see the beauty of using Excel – while entering the data was easy, when copied it creates most of the formatting for us.
However, we do need to make the final formatting changes before it can be inserted back into the XML file. Using the find and replace function (Ctrl-H) we remove the “ character and the TAB character. We can check that the formatting hack has worked successfully using the XML Language pack in Notepad++.
Note: To copy a tab, find one in the Notepad++ document, select it and copy-paste it into the Find box.
Note: Be sure to re-add the “ characters to the top line – or just copy this:
The final steps relate to getting our hacked XML back into the PBCS application:
1) Copy our new sub-rules back into the original XML file, after the tag
2) Save and overwrite your original XML file in the PBCS Export. Note: It’s very important that the same names are used for all of the files.
3) Zip up the extract again, and rename it to something you will recognise.
4) Using application management again, upload your amended extract into PBCS.
5) In application management, open your extract and navigate to your amended rule, and hit Import.
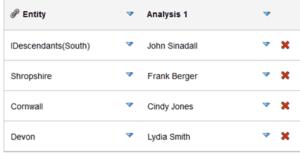
Going into the simplified interface we can see our updated rule:
Thanks for reading, and I hope this document helps you if you are considering Valid Intersections for your next PBCS project. We appreciate that while this process is fiddly, if you are able to pull it off then you can load hundreds of valid intersections at once, which is a massive development boost. If you’re trying this process and having problems, be sure to use the form below to drop me a message and I’ll get back to you ASAP.
More detailed instructions and information from Oracle on how to use and create Valid Intersection rules within PBCS are available here: https://docs.oracle.com/cloud/latest/pbcs_common/PFUSA/val_comb.htm#PFUSA-f_valid_combinations_1
Until next time…
Mike


 +44 (0)1483 685450
 contact us