
Loading Metadata using PBCS Data Management
After much anticipation, the ability to load metadata from a flat file into (e)PBCS is now supported using the inbuilt data loading ETL tool Data Management. Along with loading new members, this functionality also allows updates to properties of existing members. Members can be added or updated for all dimension types, including Smart Lists.
This blog will detail how to load new metadata to a Custom type dimension, called Grade, to a PBCS application named WFP.

Creating the Target
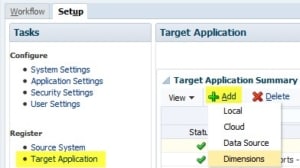
To set up a metadata load, first open the Data Management window from PBCS and navigate to the Target Application section, from the Setup tab. Add a new Target Application and select ‘Dimensions’ for the Target type, as shown below.
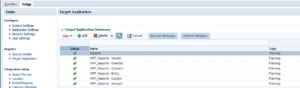
This will add one new Target Application for each type of Dimension; Version, SmartList, Scenario, Entity, Custom and Account.
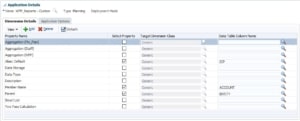
Each of the target dimension types will have the relevant member properties associated to them. For example, the Account dimension target will have extra properties for Account Type and Time Balance.
To view the associated properties, select a target dimension type and scroll down to the Application Details.
Choose the properties that will be updated from your file using the ‘Select Property’ tick box and ensure that each selected property has a Data Table Column Name assigned to it. Only properties that have been selected will appear in the import format set up, to be assigned to a column in the data file.
Setting up the Import Format
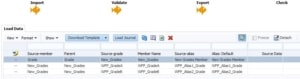
In this example, the file format used for loading the new grades is as below:
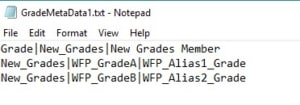
The first column holds the Parent, the second column holds the new grade member, and the third column holds the alias for the new member. This is reflected in the Import Format set up below.

If a property in your file is missing from the import format definition, go back to the Target Application and include the desired property using the ‘Select Property’ tick box.
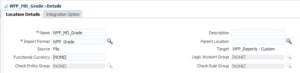
Adding a Location
Add a new Location and assign the corresponding import format. Make sure to select the correct Target Application from the dropdown at the top. In this case, the Target is “WFP_Reports – Custom”, because metadata is being loaded to a Custom dimension type.
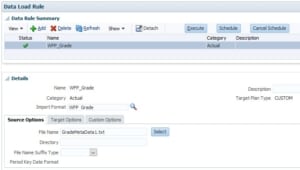
Data Load Rules
Add a new Data Load Rule for the metadata load and assign the import format created earlier. The Target Plan Type will automatically be set to CUSTOM when loading to a custom dimension.
Upload the file and select it in the Source Options, then save the data load rule.
Mappings
Go to the Data Load Mappings section on the Workflow tab to enter any necessary mappings for the metadata in the file. If no mappings are needed, use the Like * to * mapping to keep all values as they are.
Import/Export
Importing and Exporting metadata through Data Management works in the same way as loading data. To import the metadata file, Execute the data load rule and select Import from Source.
Once imported, the mapped metadata can be viewed in the Workbench before being exported to the application.

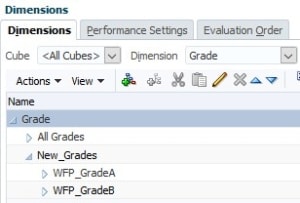
Once exported, navigate to the dimension editor to view the new Grade members.
The database will then need to be refreshed as normal.
For more Hyperion tips and tricks from me, go to http://lydia-maksoud-epm.blogspot.co.uk/.


 +44 (0)1483 685450
 contact us