
Oracle Cloud EPM pipelines – using substitution variables
Lydia Maksoud
Brovanture Consultant
Oracle Cloud EPM Pipelines allow administrators to schedule jobs in the required. These include pre-processing rules, data load rules and post-processing rules in an easy and accessible interface via Data Integration. This is replacing the existing batch functionality which is currently available in Data Management, but will soon be decommissioned.
Pipeline Variables
For each pipeline, there are automatically a number of variables set with default values:
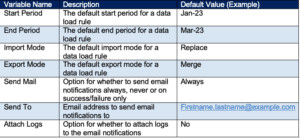
These variables can be referenced in the individual pipeline jobs or overwritten with a specific value at run time. Additional variables can also be added to each pipeline if required.
In this example, we will be adding custom variables which reference a month and year substitution variable to load data for the current month. First, we need to create the substitution variables, as below:
- Pipe_CurrMonth – references the current month for loading actuals (e.g. Jul)
- Pipe_CurrYear – references the current financial year for loading actuals (e.g. FY24)

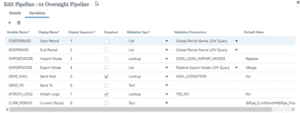
We’ve used the prefix Pipe_ to make it clear that these substitution variables are utilised in the pipeline loads. Then in the pipeline, we will add a new variable, in addition to the default variables above. To view or edit the pipeline variables, open the pipeline and use the Edit Pipeline pencil.
Add the new variable, as below:

Note: to reference variables, the variable value must be in format Month#Year, for example Jul#FY24.
Job Parameters
Each job has various parameter settings depending on the job type. These settings can reference Pipeline level variables, for example our new CURR_PERIOD variable which references substitution variables, or use a specific setting for that particular job.
An integration job has the following parameters:
- Name – name of the job
- Title – title of job
- Sequence – the order of the job within the stage, e.g. 1st job of the stage
- Import Mode – the import mode, e.g. Replace or use $IMPORTMODE to use the pipeline default setting
- Export Mode – the export mode, e.g. Replace or use $EXPORTMODE to use the pipeline default setting
- Start Period – the start period, where we can use one of the following options:
- Manually enter the month Jan-23
- Use $STARTPERIOD to use the pipeline default setting
- Or, we can now reference our new variable $CURR_PERIOD which is defined using our substitution variables
- End Period – the start period, where we can use one of the following options:
- Manually enter the month Jan-23
- Use $ENDPERIOD to use the pipeline default setting
- Or, we can now reference our new variable $CURR_PERIOD which is defined using our substitution variables
Once the pipeline is setup referencing the substitution variables, they can be rolled forward like any other variable by editing the substitution variable in the Variables area. This will then reflect automatically in the pipeline definition to run the pipeline job for the new current month.
Scheduling a Pipeline
To schedule a pipeline, navigate to the Jobs console, add a new scheduled job and select the Pipeline job type. Once configured, the schedule pipeline will be displayed in the Pending Jobs list in the Jobs console.
Note: if updates are made to the Pipeline variables directly in the Pipeline definition, the Pipeline job must be deleted and re-scheduled in the Job Console to reflect the variable updates. This is not required for changes to Pipeline jobs, only the variables, for example a change of email address for notifications.
For more information on why to switch to pipelines, check out my blog here: https://brovanture.com/why-oracle-cloud-epm-pipelines-have-all-the-answers/
Until next time
Lydia


 +44 (0)1483 685450
 contact us